Monday, December 13, 2010

Gumbo Z'Herbes

OK, well it has been a month since the last post.  But we have been busy and have been keeping with our every other week regimen.  A few weeks ago we tried out a New Orleans dish that we had tried before.  It's called Gumbo Z'Herbes (aka Green Gumbo) and is unique as it requires a garden patch worth of greens.  It's certainly unique, however we both agreed that it was a bit low on salt, and for all of the potent greens in the dish, it didn't have as much flavor as I would have liked.  Oh and next time we would halve this recipe as our freezer still has three containers of frozen green gumbo.  But there are worse problems to have.  Overall a thumbs up, with perhaps a few flavorful modifications.


Gumbo z'herbes breaks all the rules of gumbo.  It uses neither okra nor file; it is the only gumbo in which the roux is not prepared first; originally it contained no meat, seafood or game.
A Lenten dish, it was traditionally served on Good Friday.  Legend had it that you would make as many friends as the number of different greens you put in the gumbo.  Seven greens, seven new friends.  The flavor that comes from combining many different greens is what makes this gumbo so delicious - the number is unimportant.  No longer exclusively a Lentin dish, gumbo z'herbes is often prepared with meat, as in the recipe here.  We include it because it is good to eat and because the first time we served it we made seven new friends.

Greens (as many of these are available: a minimum of 5 is adequate, 7 or 8 are perfect)
1 bunch collard greens
".." mustard greens
".." turnip greens
".." shallots (scallions)
".." parsley
".." watercress
".." spinach
".." beet tops
".." radish tops
".." chicory
".." carrot tops
1 small head green cabbage

The Gumbo Base
1 cup chopped onion
1/2 lb. lean baked ham, cut into 1/2-inch cubes
1/2 lb. Creole (Polish, French garlic) smoked sausage, cut into 1/2-inch cubes
1/2 lb. lean veal, cut into 1/2-inch cubes
1 large ham bone, sawed into 3 to 4 inch lengths

The Roux
1/2 cup vegetable oil 
2/3 cup flour

The Liquid and the Seasonings
2 quarts plus 1/3 cup cold water
1 tsp. salt
1/4 tsp. black pepper
1/8 tsp. cayenne
2 whole bay leaves, crushed
1/2 tsp. dried thyme
1/2 tsp. dried marjoram
2 whole cloves
6 whole allspice

Wash all the greens thoroughly, taking care to remove all sand and to trim off any tough stem ends or discolored outer leaves.  Place the washed greens in a colander and rinse under cold running water.  Let the excess water drain off then shake the colander lightly.  Place the damp greens in a heavy 3 - 4 quart saucepan, add the 1/3 cup cold water and turn the heat to high.  When the liquid at the bottom of the pan begins to boil, cover the pan tightly, reduce the heat to medium, and cook the greens for 12 to 15 minutes, or until just tender.  Remove the pan from the heat and drain the greens by dumping them into a colander placed over a large bowl to catch the liquid formed during cooking.  Reserve the liquid.  Chop the cooked greens fine and set them aside.
In a large 7-8 quart heavy pot or kettle, heat the oil over high heat.  Reduce the heat to low and gradually add the flour, stirring constantly.  Cook over low heat, always stirring, until a golden brown roux (the color of peanut butter) is formed.  Quickly add the chopped onion, stir thoroughly and continue browning for 5 minutes longer, still stirring.  Add the ham, sausage, veal and the liquid reserved from cooking the greens; mix well, then gradually stir in the chopped cooked greens.  Add the ham bone and the seasonings.  Keeping the heat low, gradually add the 2 quarts cold water, stirring to mix thoroughly.  Raise the heat to high, bring the gumbo to a boil, then lower the heat again to low and simmer for 1 1/4 hours.  Serve over boiled rice.

Sunday, November 14, 2010

Boiled Shrimp (a joint venture)

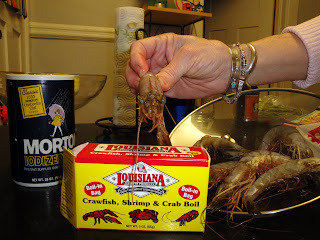
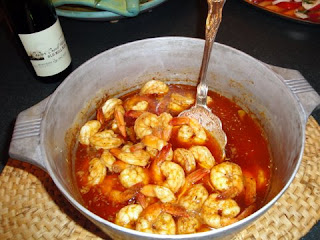
While my parents were in town this last weekend we decided to tackle a recipe together, and since fresh gulf seafood products are not plentiful in the great lakes region, we decided to make Boiled Shrimp.  Far from the most difficult recipe to make, it certainly is one of the harder ones to eat.  None of us had  particularly solid methodology in peeling these suckers, but once you were through with the autopsy, the final product was pretty tasty.  One thing I learned is that it doesn't take long for the shrimp to absorb the flavor of whatever else you put in the boiling pot with it.  We also cheated a bit by purchasing some seafood dip sauce.  Overall I don't think we'll make this often, but it wasn't bad.
Boiled Shrimp

New Orleanians like their shrimp very well seasoned.  But because of the mistaken notion that shrimp must cook a long time to absorb flavor, many local boiled shrimp are soggy.  The best way to ensure firm and spicy shrimp is to boil the court-bouillon for 10 minutes before adding the shrimp, then boil no more than the prescribed 5 to 7 minutes and remove at once from the water.

2 lbs. whole shrimp
1 1/2 Tbs. liquid shrimp and crab boil
1 cup salt
Juice of 2 large lemons
5 drops Tabasco
4 qt. cold water

Put all the ingredients except the shrimp into a heavy 8 to 10 quart pot.  Bring to a boil and boil for 10 minutes, then add the shrimp to the boiling water.  When the water boils up again, boil the shrimp for 5 to 7 minutes.  Remove the shrimp immediately from the boiling water by dumping them into a colander.  Allow to drain thoroughly, then let cool at room temperature for 5 minutes.
Place the shrimp in a large bowl, cover with several layers of plastic wrap, and refrigerate.  Serve chilled.  Accompany with dipping sauce made with ketchup, horseradish, lemon juice and Tabasco.

Monday, October 25, 2010

Chicken Maquechoux

For our second recipe of October, we chose Chicken Maquechoux (pronounced Mock-Shoe).  Like a lot of other recipes, this was one where you essentially dump a bunch of ingredients and seasonings into one pot and your good to go.  But unlike some of the other recipes, as my mom pointed out, this one didn't have a lot of the typical cajun spices, which is OK.  As I put in the immense amount of corn, tomato, green pepper, onion and seasonings, a ton of smell erupts and its like you're cooking a kind of corn salsa.
I must admit that I cheated and avoided the fryers (chickens) by just using chicken breasts, which actually turned out to be a problem.  When I put in the meat, it really never browned but instead seemed to poach in the oil and probably made the maquechoux a bit more watery than it is intended to be.  My mom on the other hand was more comfortable with the fryers and used those instead.
Anyway, we both concluded it was very tasty, easy to make, and not a bad break from more of the traditional cajun/creole flavors.


"Maquechoux" is a Cajun word meaning a smothered dish made with fresh corn.  This hearty chicken stew is prepared with fresh corn and fresh ripe tomatoes.  When you strip the kernels off the cob, save the cob liquid and squeeze as much of it as you can our of the cobs.  When fresh corn is not in season, substitute canned or frozen corn and add about 2 and a half teaspoons heavy cream in place of the corn cob liquid.  Serve chicken maquechoux in wide soup bowls with pieces of chicken, kernels of corn, and plenty of liquid from the pot in each.  Provide soup spoons - the liquid is delicious and shouldn't be wasted.

1/4 cup veg oil
2 small fryers (2 1/2 to 3 lbs. each), cut up
3 1/2 to 4 cups fresh corn scraped off the cob, corn cob liquid reserved (substitute 14 to 16 oz. frozen or canned corn when fresh is unavailable)
2 Tbs heavy cream
3 cups chopped onion
2/3 cup green pepper chopped
2 large tomatoes, chopped
1/4 tsp thyme
1/4 tsp basil
1 Tbs parsley
3 tsp salt
1 tsp black pepper
2 to 3 Tbs milf, if necessary

In a heavy 8 to 10 quart pot or kettle heat the oil over medium heat.  Brown thchicken parts in the hot oil, turning frequently with tongs to brown evenly.  Reduce the heat to low once the chicken begins to brown (15 to 20 minutes), then lower the heat still further and add the corn, corn liquid, and cream.  Mix thoroughly.  Add the onion, green pepper, tomatoes, herbs, salt and pepper and cook over low heat for 30 to 45 minutes, or until chicken is very tender, stirring frequently.  If the mixture seems to be becoming too dry, add 2 to 3 tablespoons of milk toward the end of the cooking period.  Serve hot in soup or gumbo bowls.

Tuesday, October 12, 2010

Cheese Straws

Next on the list, a southern appetizer: Cheese Straws.  Pretty easy to make and hard to go wrong between a bunch of butter and a load of cheese.  To me and my wife they tasted very similar to Cheese Nips (I mean that in a good way).  I think they could have been spiced up a bit by adding some Tabasco or maybe just some Joe's Stuff seasoning to the dough.  It may make them a little more interesting.  Either way they would be an easy thing to make for a party and a little more impressive than just a bowl of Cheese Nips.  Use leftovers in some soup!  My mom and I both agreed that you have to be very careful about overcooking them though.  Some of the ones on the edge of our cookie sheet began to turn brown and the taste completely went downhill.


DSC01368.JPG

1 2/3 cup flour
1 1/4 teaspoon dried mustard
1 teaspoon salt
1/4 teaspoon cayenne pepper
1/2 pound extra-sharp cheddar, grated
1 stick unsalted butter at room temp
2 tablespoons water

Sift the flour, mustard, salt and cayenne into a medium bowl. Using an electric mixer, beat the cheese and butter on low speed until well blended. Gradually beat in the flour until completely incorporated. Add the water and beat for 1 minute. 2. Turn the dough out onto a lightly floured surface and knead 5 times. On a large sheet of wax paper, roll the dough into a 12-by-9-inch rectangle. Slide the dough onto a cookie sheet and refrigerate until chilled, about 15 minutes. 
Preheat the oven to 425°. Cut the dough in half crosswise, then cut it into 6-by- 1/4 -inch strips. Transfer the strips to 2 cookie sheets. Bake 1 sheet at a time for about 14 minutes, or until the cheese straws are golden brown and crisp. Let cool slightly, then transfer to a rack to cool completely.

Sunday, September 26, 2010

Sweet Potato and Peach Chantilly

Sorry, I have been way behind in posting this.  A couple weeks ago we decided to take on a dessert recipe with a bit of an odd combination: sweet potatoes and peaches.  Too intriguing to pass up, and we figured that we should do this while peaches are at least OK in the Wisconsin markets.
It was a pretty simple thing to make, although it was difficult to tell how 'soupy' it should or shouldn't be.  A lot of Thanksgiving flavors locked into the dessert between the sweet potatoes (or yams, which I used) and the nutmeg.  But we quickly learned that whipped cream on a hot dessert dissolves pretty quickly, so we substituted some store bought 'pralines and cream' ice cream, which was awesome.
Overall my Mom and I both felt that it was good, interesting, and a bit earthy, but it won't be something that we will be rushing to make again.


An unusual and delicious combination, a favorite local vegetable with fresh ripe peaches.  Serve this hot, with plenty of homemade whipped cream put on at the last minute.

6 medium sized sweet potatoes or yams (about 3 cups), baked and diced
Salad Oil
2 lbs fresh ripe peaches (about 3 cups) pitted and diced
1/2 cup cold water
1 cup corn syrup
1/4 tsp salt
1/8 white pepper
1/4 cup brandy
5 TBs salted butter
1/2 tsp cinnamon
1/4 tsp grated nutmeg
Whipped cream for topping

Wash and dry the sweet potatoes rub them lightly with salad oil and bake in a 450 degree oven for 35 minutes.  Allow them to cool, then peel and dice into 1-inch cubes.  Wash the peaches, remove the pits, peel off the skin, and dice as for the potatoes.  Butter a 3 quart baking dish and preheat the oven to 375 degrees. 
In a saucepan combine the potatoes, peaches, water, syrup, salt, pepper and brandy.  Bring to a boil and cook for 10 minutes or until the liquid in the pan begins to turn quite thick.  Remove the potato and peach segments with a slotted spoon and put some of them in a layer in the prepared backing dish.  Pour some of the syrup from the pan over the layer.  Cut the butter into small pieces and use about six pieces to dot the layer, then sprinkle with some cinnamon and nutmeg.  Repeat the layers until all of the peach and potato mixture is used up. Cover the top with the remaining butter and a bit more syrup.  Bake uncovered in the preheated oven for 35 to 40 minutes, or until the top turns brown and the liquid in the baking dish is well candied.  Serve hot with about 1/2 cup of whip cream for each portion.

Sunday, September 12, 2010

Door County Barbecue Shrimp

A little late posting these pictures.  The barbecue shrimp was a hit in Wisconsin, but my mom could only find the frozen variety of shrimp, so she suspected that ours was better.  Really, since we're not shrimp experts, I'm sure they would be pretty equal to my palate.  And hers was less fussy, with no heads, tentacles or little legs to deal with.  Talk about taking out all the fun (my wife shakes her head).

Tuesday, August 31, 2010

Barbecue Shrimp in NOLA

The first time I went out to dinner in New Orleans was this spring on our first visit, and it was at Deanie's Seafood in the french quarter.  I ordered a dish called Barbecue Shrimp, and it may never be forgotten, for a number of reasons:
1. It's not barbecue in the way that I am familiar with.  No grills, no mesquite involved.
2. It was absolutely delicious (this really should be reason #1).  It wisely came with a little baguette for soaking up all the delicious juices in the skillet that the shrimp are served in, because you won't want to leave any flavor behind.
3. I never knew shrimp came that big, complete with giant heads, horn and tenticles that blew in the wind as the waiter walked the dish over.
4. I didn't use any utensils, and each shrimp needs to be peeled by the diner.  Needless to say, my hands needed multiple rounds of firm scrubbing.

So Sunday night we made this delicious dish.  I went to the grocery and got fresh, huge shrimp complete with heads, eyeballs and 5 inch tenticles that put a frown on Megan's face.  We halved the recipe for the two of us, using only 1 lb of shrimp that came out to 18 shrimp.  But while we were making the sauce, we thought back to Deanie's and how the shrimp there were swimming in so much sauce, that near the end I had to poke around in the skillet to be sure I had found all of the shrimp.  And it's so delicious, why wouldn't more be better?  So we halved the shrimp, but kept the sauce at the original recipe levels.  It was really easy to make and turned out great (although not quite as good as Deanie's, it was close).  We toasted up some french bread to soak in as much sauce as possible, and contemplated that you could easily substitute chicken or mixed vegetables if you weren't in the mood (or location) for shrimp.  I think our favorite thing about the sauce is that you can taste each of the herbs that are put in, and it comes with just enough of a kick.  It is a bit of work to peel all of those shrimp, but we'll definitely be making this again (after our arteries have cleared).


1 cup (2 sticks) salt butter
1 cup veg. oil
2 tsp. minced garlic
4 whole bay leaves crushed
2 tsp. crushed dried rosemary leaves
1/2 tsp. dried basil
1/2 tsp. oregano
1/2 tsp. salt
1/2 tsp. cayenne
1 Tbs. paprika
3/4 tsp. freshly ground black pepper
1 tsp. lemon juice
2 lb. whole fresh shrimp in the shell

In a heavy saute pan or sauce pan melt the butter, then add the oil and mix well.  Add all the other ingredients except the shrimp and cook over medium heat, stirring constantly, until the sauce begins to boil.  Reduce the heat to low and simmer for 7 to 8 minutes, stirring frequently, then remove the pan from the heat and let it stand, uncovered, at room temp. for at least 30 minutes.  Add the shrimp to the sauce, mix thoroughly, and put pan back on the burner.  Cook over medium heat for 6 to 8 minutes, or just until the shrimp turn pink, then put the pan in a preheated 450 degree oven and bake for 10 minutes.  Serve equal portions of shrimp with about 1/2 cup of sauce ladled over each one.


Monday, August 23, 2010

And it begins

My mom couldn't wait, so she dove in with an easy drink recipe.  Her notes follow:


"This is very refreshing and not at all too sweet.  Skip said the taste was "very complex."  The mint is not overpowering by any means.  Although my pitcher holds 2 quarts of liquid, I could only put in 1 quart with all the other ingredients.  Since it was then a "concentrate,"  I added additional water to each serving.  Easy to make--you just need to plan ahead as it is not ready immediately!"


ICED MINT ORANGE HONEY TEA
 
1 large bunch fresh mint
3 oranges, halved top to bottom, end slices discarded, sliced 1/8" thick
2/3 c honey 
2 quarts cold water
6 Earl Grey tea bags
 
After the mint is washed, place it in a large glass pitcher.  Add the orange slices, then the honey.  Use a wooden spoon to crush the ingredients until lightly broken up, and the mint and honey are mixed with orange juice.  Add the cold water and stir.  Place the tea bags on top; cover pitcher with plastic wrap.  Let it sit on the counter for about 12 hours to "brew."  Remove the tea bags and squeeze remaining liquid back into the pitcher.  Serve over ice.


Thursday, August 19, 2010

What is this?

What is this blog about?  Well, I made this blog to share with my mom for her #($&'th birthday.  Back up: one of my mom's many qualities is her great ability to cook.  A spillover effect of this ability is creating children (my brother and I) who also like to cook and expect to eat pretty good and reasonably healthy things.  So, when I got married this summer and moved two weeks later down to New Orleans, LA, with its tremendous cuisine and intriguing culture represented in every dish, I had to 1) take advantage of said cuisine and 2) find a fun way to keep in touch with my mom back in Wisconsin.
SO, what is this blog about?  Every two weeks my mom and I will select a recipe from one of three Creole/Cajun cookbooks, prepare the dish separately (with substitutes as needed as there aren't a lot of crawfish in Wisconsin), take a picture and blog about each dish with our thoughts, and anything else someone who happens to be around the table may say.  And when she comes down to visit, we'll do the dish together.  
I hope you enjoy it, but it's really for my mom.